Tag: iOS

  • How to enable iOS software home button settings

    How to enable iOS software home button settings

    The home button is the biggest button on iOS devices and probably the most important one. It’s a great example of what makes the iPhone and iPad so easy to use – that single button will always take you to the home screen no matter what you’re doing.


    On many Android devices, home is a software button that disappears inside apps, leaving you feeling stuck, but the physical home button on iOS devices is always there. At the same time, power users can double and triple tap the button for additional functions.

    How to enable iOS software home button settings

    Unfortunately, this extensive usage means that the home button can become unresponsive. This can really make using the device frustrating, particularly if you’re using an older device that doesn’t support gestures.

    If you’re facing the same problem, then you should enable the software button option on your iOS device, and this is how you do it:

    How to add touchscreen Home Button on iPhone, iPad

    • Open Settings.
    • Go to General > Accessibility
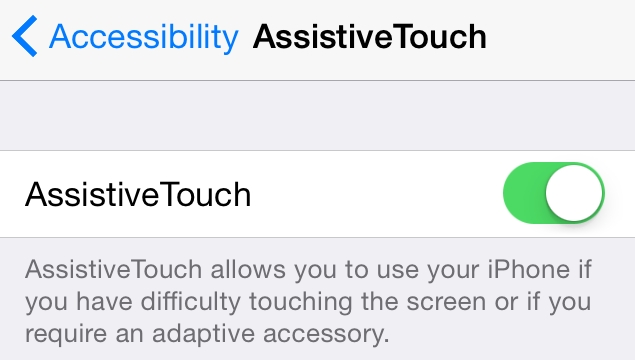
    • Scroll down to the section labeled INTERACTION and tap on AssistiveTouch.
    • On the next screen, toggle AssistiveTouch to the green On position.

    iOS software home button settings

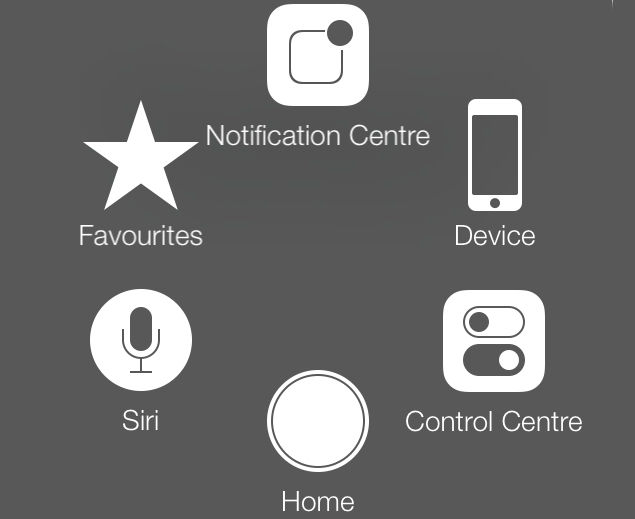
    A white circle with a grey box will appear on screen. Tap this circle to expand it to a big box on screen. The square Home button at the bottom of the box functions exactly like the physical home button – you can use it to single tap, double tap, or long press the home button even if there is a hardware problem. The grey box remains visible and usable in all apps.


  • How to backup your iOS devices via iTunes or iCloud

    If you do not have a PC or a Mac, backing up on iCloud may be your best option.

    These days 16GB iOS devices are slowly being phased out and that means most people will have a lot of data to be backed up on iCloud.

    The free tier on iCloud offers just 5GB of storage space. If you require more space, that means you will need to shell out a small sum of $1 per month for 50GB of iCloud storage, and that should be sufficient for iCloud backups and other purposes like storing your photos using the iCloud Photo Library.

    Backing up your iPhone, iPad, or iPod Touch via iTunes is a better option in many ways. It is free, it lets you backup purchased apps as well (so you don’t have to reinstall apps if you switch to a new iOS device), and doesn’t require Internet.

    However, it also means you will have to plug-in your iOS device to a PC or a Mac and install iTunes if it’s not there already.

    You will also need to plug-in your phone to this computer every time you want to back up the device, unless you have a computer that is on all the time and connected to the same Wi-Fi as your phone.

    How to backup iPhone via iCloud

    • On your iOS 10 device, open Settings > tap your name right at the top > iCloud > iCloud Backup.
    • Tap the button next to iCloud Backup to turn it on. If it’s green, backups are on.
    • Tap Backup Now if you want to manually initiate a backup.
    • This will backup important data such as accounts, documents, Health data, etc. Backups will happen automatically when your iOS device is locked, being charged, and connected to a Wi-Fi network.

    iCloud backups are preferred because they happen automatically, without you needing to do anything, which ensures that your backups are up to date.

    When you sign in to another iOS device with this iCloud account, you’ll be asked whether you want to restore from a backup.

    How to backup iPhone via iTunes

    • Connect your iPhone, iPad, or iPod Touch to your PC or Mac.
    • Open iTunes on the PC or Mac (it might launch automatically when the iPhone is connected).
    • If you use a passcode on your iOS device, unlock it.
    • You may see a prompt asking whether you want to trust this computer. Tap Trust.
    • On iTunes, a tiny icon showing your iOS device will appear in the top bar. Click it.

    iPod nano iTunes icon

    • Under Backups, click This computer.
    • Click Back Up Now. Now iTunes will begin backing up your iOS device.
    • Once the process is finished, you can check for backups by going to iTunes > Preferences > Devices on your Mac. Preferences is under the Edit menu in iTunes for Windows.
    • You can select the Automatically sync when the iPhone is connected option for iTunes to launch automatically and backup your iPhone when it is connected to this computer.

    You can also use the Sync with this iPhone over Wi-Fi to have iTunes backup your phone wirelessly, but you will need to make sure that the computer and iTunes are running for this option to work. With this option on, your iPhone will try to backup to this computer using iTunes when it is charging and connected to the same Wi-Fi network as the computer. This is convenient if it’s not possible for you to always plug-in your iPhone to your computer.

    To restore from an iTunes backup, you will need to connect the iPhone/ iPad/ iPod touch to the same computer.


    That’s how you can backup your iOS devices.


  • Cyber threats: Why you need to backup your Smartphone now

    With the growing numbers of cyber attacks, it is advisable to do a phone backup every now and then, especially as smartphones are more susceptible to these attacks.

    Some things can’t be replaced if we lose or damage our phone. If you lose or damage your phone, you do not want to be left mopping after losing all of your data.

    Think about all of the pictures, videos, messages, passwords, and other files on your smartphone.

    If you lose or damage one device, you could end up losing a significant chunk of your life.

    There’s one easy and effective way to ensure that you never lose data – backups.

    Fortunately, these days, smartphones makers and OS developers have made it easier to do backups, as these are now major features on the phones, and especially, backups are very easy and most people won’t need to pay anything to do this.

    Here is how to backup your Android and iOS devices.


  • How to block pop-up in Firefox

    Browsing the Web on your phone or computer can become a fraught experience if you visit sites that throw a lot of pop-up at you.

    It is particularly bad on the mobile where it is hard to dismiss these. However, this is slowly becoming less of an issue, as most browsers now allow you to prevent pop-ups altogether.

    Here are steps to block pop-ups with Firefox.

    How to block pop-ups in Firefox (Windows/ macOS/ Linux)

    • Open Firefox.
    • Click the hamburger menu button in the top-right corner, and choose Options.
    • Choose Content in the left-hand side.
    • Tick Block pop-up windows to block pop-ups, or untick to allow.

    Popup Firefox PC

    How to block pop-ups in Firefox (Android)

    • Open Firefox.
    • Type about:config in the address bar.
    • Search for dom.disable_open_during_load.
    • Set it to false to allow pop-ups, and true to block pop-ups.

    How to block pop-ups in Firefox (iPhone/ iPad)

    • Open Firefox.
    • Tap the hamburger menu button at the bottom.
    • Swipe left, and then choose Settings.
    • Turn on the toggle for Block Pop-up Windows to block pop-ups, or turn it off to allow pop-ups.

    Popup Firefox iOS


    Also read:

    >>How to block pop-ups in Opera browser

    >>How to block pop-ups in UC Browser

    >>How to block pop-ups in Google Chrome


  • How to block pop-ups in Opera browser

    In this series, we have talked about how to block pop-ups in Google Chrome and how to block pop-ups in UC browser; this time around is you will find out how to block annoying pop-ups in Opera browser.

    When you are browsing on your mobile phone with Opera browser, a pop-up can completely take over the screen or bombard your device with unwanted tabs, degrading performance badly.

    The good news is that whether you are browsing on your phone or on the PC Opera comes with a feature that allows you to put pop-ups in their place.

    Opera is one of the most popular browser in Nigeria – across desktop, mobile, and tablet combined – and you can follow the steps below to manage pop-ups.

    How to block pop-ups in Opera (Android)

    1. Open Opera.
    2. Tap the hamburger menu button in the bottom-right corner, and then tap the gear icon in the middle.
    3. Scroll down to find Block pop-ups under the sub-head Content.
    4. Turn off the toggle to allow pop-ups, or turn it on to block pop-ups.

    How to block pop-ups in Opera (iPhone/ iPad)

    1. Open Opera.
    2. Tap the Opera logo in the bottom tray, and then choose Settings.
    3. Turn on the toggle for Block Pop-up Windows to block pop-ups, or turn it off to allow pop-ups.

    ImageFile: Popup Opera iOS

    How to block pop-ups in Opera (Windows/ macOS/ Linux)

    1. Open Opera.
    2. Click the menu button in the top-left corner, and then choose Settings.
    3. Choose Websites from the left-hand side.
    4. Under Pop-ups, choose from the two options to allow or block pop-ups.

    ImageFile: Popup Opera PC


  • How to block pop-ups in UC Browser

    Earlier we treated how to block pop-ups in Chrome, and here, for UC Browser, you will find out how to block annoying pop-ups that tend to take over the entire screen, especially on mobile.

    Unlike for Google Chrome, UC Browser does not have a standalone setting for blocking pop-ups. Instead, its ad-block function takes care of both ads and pop-ups.

    How to block pop-ups in UC Browser (Android)

    1. Open UC Browser.
    2. Go to Settings from the quick menu on the bottom of the screen.
    3. Tap on Adblock.
    4. Toggle Adblock on.

    ImageFile: Popup UC Browser


    How to block pop-ups in UC Browser (iPhone)

    1. Open UC Browser.
    2. Go to Settings from the quick menu on the bottom of the screen.
    3. Tap on Adblock.
    4. Toggle Adblock on.


    For more tutorials, visit our Tips & Tricks section.
    For latest news, tips and tricks, follow TheNewsGuru on Twitter, like our Facebook page, and subscribe to our YouTube channel.


  • How to block pop-ups in Google Chrome

    Pop-ups can be really annoying while browsing, especially on mobile as opposed to desktop. They often take over the whole screen and it’s not exactly convenient swiping them away with your fingers unlike on a PC with a mouse.

    Most browsers like Google Chrome, Opera, UC Browser, and Firefox, offer a built-in pop-up blocker, which you can use to stop the pop-ups.

    Google Chrome is one of the most popular browsers in Nigeria – across desktop, mobile, and tablet combined.

    Here is how you can block pop-up in Chrome on Android, Windows, iOS, and macOS.

    How to block pop-ups in Chrome (Android)

    1. Open Chrome.
    2. Tap the three vertical dot menu button in the top-right corner.
    3. Choose Settings > Site settings > Pop-ups.
    4. Turn on the toggle to allow pop-ups, or turn it off to block pop-ups.

    ImageFile: Chrome android


    How to block pop-ups in Chrome (iPhone/ iPad)

    1. Open Chrome.
    2. Tap the three vertical dot menu button in the top-right corner.
    3. Choose Settings > Content settings > Block Pop-ups.
    4. Turn on the toggle to allow pop-ups, or turn it off to block pop-ups.

    How to block pop-ups in Chrome (Windows/ macOS/ Linux)

    1. Open Chrome.
    2. Click the three vertical dot menu button in the top-right corner.
    3. Choose Settings.
    4. Scroll to the bottom, and click on Show advanced settings.
    5. Under Privacy, choose Content settings.
    6. Under Pop-ups, choose from the two options to allow or block pop-ups.

    >>Also read: How to block pop-ups in UC Browser

    ImageFile: Chrome desktop


    For more tutorials, visit our Tips & Tricks section.


    For latest news, tips and tricks, follow TheNewsGuru on Twitter, like our Facebook page, and subscribe to our YouTube channel.


  • Microsoft launches Modern Keyboard with fingerprint scanner

    Microsoft on Thursday silently unveiled a new keyboard, called the Microsoft Modern Keyboard.

    Priced at $129.99, the new Modern Keyboard is listed as “coming soon” on the company’s US website with no word when the accessory will go on sale.

    The highlight of the keyboard is that it comes with a fingerprint scanner that just looks like any other key on the keyboard.

    “Our vision was to blend the Fingerprint reader into a keyboard, so it would appear to be any other key.

    “We iterated relentlessly to improve each layer, making sure they came together to create a flawless typing experience that felt like any other key,” Microsoft says on the product page of the Modern Keyboard.

    The keyboard comes with aluminium frame and Microsoft claims it sports “highest quality” and is “virtually indestructible”.

    The Modern Keyboard will allow Windows 10 users to enable Windows Hello fingerprint authentication on their devices.

    The fingerprint scanner has been placed on the second Windows key on the right side of the keyboard, and can be used for signing in to the system or any website using Windows Hello.

    The Microsoft Modern Keyboard with Fingerprint Scanner will work with Windows 8 and above devices, macOS 10.10.5 and above devices, Android 4.2 and above, and iOS 8 and iOS 9.

    Users need to make sure that the device should support Bluetooth 4.0 or higher for the Microsoft Modern Keyboard to work.

    Microsoft will also let users choose between using the Modern Keyboard with wireless or wired interface.

    It comes with dimensions 420.9×112.6×19.3mm and weighs roughly 420 grams.

    The wireless Microsoft Modern Keyboard runs on two AAA alkaline rechargeable batteries.

    Microsoft claims a battery life of up to 2 months on full charge.

    The Redmond giant will be offering one-year limited warranty on the keyboard.


  • How to stop WhatsApp from downloading, saving photos, videos automatically

    WhatsApp is used by over a 1.2 billion people worldwide. It is probably one of the first apps anyone in Nigeria downloads when they get a new smartphone as it has become the default means of texting in the country.

    However, it can become an annoyance too when it downloads all media files automatically sent to you, from pictures to videos to, more recently, GIFs, not to mention audio files and videos.

    These not only clutter your phone’s gallery and music player, but also eat up a lot of storage and data.

    Here’s how you can stop WhatsApp from automatically saving photos and audio on your phone.

    How to Stop Auto Downloading and Saving of Pictures, Videos and Other Media on Whatsapp for Android

    WhatsApp for Android has a switch that lets you stop images and videos from downloading. Here’s how you can do it:

    1. Open WhatsApp, make sure you are seeing the main window – where all your chats are displayed. Tap the three vertical dots on the top right > Settings.
    2. Now tap Chat settings > Media auto-download. You’ll see three options: When using cellular data, When connected on Wi-Fi and When roaming. Tap each one and disable auto-downloads by unchecking all three options – Images, Audio and Video.

    To view photos, you will have to download them. When you do, WhatsApp saves them in a folder, and you can get inundated with stupid memes and other unwanted content, which is visible to anyone who open’s your phone’s Gallery App. However, it is possible to stop these photos from appearing in the Gallery app. Here’s how:

    1. Download Quickpic and open the app.
    2. Navigate to the WhatsApp media folders. The location of the WhatsApp folder varies across devices but it should typically be the following: Internal Storage (sometimes labelled sdcard0) > WhatsApp > Media > WhatsApp Images, > WhatsApp > Media > WhatsApp Audio, and WhatsApp > Media > WhatsApp Videos.
    3. Long-press the WhatsApp Images folder and make sure that it is selected. Do the same with the WhatsApp Video and WhatsApp Audio folders.
    4. After selecting the three folders, tap the three dots icon on the top-right > Hide. This will ensure that the Gallery app doesn’t show them. You can still view these images and videos within WhatsApp and through any apps that let you view hidden folders. But if you pass your phone to someone, you no longer need worry about them seeing the WhatsApp photos and videos through the Gallery app.

    ImageFile: WhatsApp autodownload1

    How to Stop Auto Downloading and Saving of Pictures, Videos and Other Media on WhatsApp for iPhone

    You can turn off media auto-download on iPhone too via the Settings menu.

    1. Open WhatsApp and tap the Settings button at the bottom-right, and tap on Data and Storage Usage
    2. In this menu, you will see the Media Auto-Download option on top
    3. For Photos, Audio, Videos, and Documents, select the Never option

    Now only the files you choose to download manually will appear on your phone, and you can even choose to stop the photos and videos from appearing the phone’s Camera Roll. All you need to do is to go to Chats in the Settings menu, open the Save to Camera Roll menu, and turn it to off. This stops the pictures people are sending from showing up in the camera roll, and taking over your synced Photo Stream.

    ImageFile: WhatsApp autodownload2

    Bonus: How to Block a Contact on WhatsApp

    Not saving images automatically has its advantages, but it also means that you will have to download each photo manually. If you end up downloading each and every image anyway, then it’s probably best to leave this feature active. Let us know if this tutorial helped you via the comments. For more such useful articles, visit our How to section.


  • Big changes coming to your Apple device

    Big changes coming to your Apple device

    Apple recently announced some big changes to be rolled out to its devices later this year.

    The consumer tech giant has released a new range of tablet devices, is set to unveil the iPhone 8 sometime around September and pretty soon will release a new operating system to accompany them.

    The company is calling it the biggest software release ever for the iPad and it’s packed full of pretty cool upgrades.

    Apple’s iOS 11 brings powerful multi-tasking features, new ways to manage files and deeper integration with Apple Pencil on its tablet device.

    Here are just a handful of changes you will see on your iPad and iPhone when iOS 11 rolls out.

    A NEW APP STORE

    Apple has completely changed the look of the Apple store to reimagine it as a place where users can find stories and content about the latest apps and developer news.

    The idea is to attract users on a more frequent basis and turn the app store into a more engaging and content friendly environment.

    The new app store also allocates games such as Candy Crush their own category in the top ranked apps. As a majority of the most popular apps are games, the change will give more exposure to developers creating unique and different applications and should make stumbling across great new apps a little easier.

    A new Today tab will appear to highlight special apps and new arrivals on offer.

    ImageFile: Apple makes big changes1

    DRAG AND DROP

    Those using iOS 11 on their iPad are in for a real treat. With competition heating up in the tablet and two-in-one laptop market, Apple has boosted the power of its latest range of tablets and brought in some great new functions.

    Apple has always excelled at providing an intuitive interface and that experience will be improved for iPad customers as iOS 11 brings support for multi-touch drag and drop between applications.

    For instance, users can highlight a bunch of different photos, pull up the applications bar at the bottom of the screen, open up messenger or email and then drag and drop the photos into a message to send to a friend.

    You will also be able to drag and drop files between apps that are running simultaneously in split screen mode.

    This week, multiple reports pointed out that inter-app drag and drop actually exists in iOS 11 beta for iPhone but is disabled and hidden. The news has caused many in the industry to speculate that the improved drag and drop functionality could soon come to the iPhone as well.

    ImageFile: Apple makes big changes2

    SIRI GETS A NEW VOICE

    Both male and female versions of Siri will be getting a new and reportedly more natural-sounding voice.

    With tech companies wanting us to talk to our devices more than ever and Apple’s introduction into the smart home speaker market, giving a facelift to our favourite virtual assistant makes a lot of sense.

    Another exciting Siri addition is a translation feature which will let you translate English into other languages. The update will let you ask Siri to speak translations, a feature that Google Assistant already offers on Android.

    NEW CONTROL CENTRE

    The quick access menu on your iPhone will also look rather different on iOS 11.

    The handy shortcut menu can be pulled up by swiping up from the bottom of your device and features controls for things such as brightness and volume adjustment, as well as buttons for data links, flashlight and the calculator.

    The new look menu can be seen below and now includes the option to turn on/off mobile data from the Control Centre.

    DO NOT DISTURB WHILE DRIVING

    Apple wants you to be safe behind the wheel — so it’s helping you help yourself.

    A new do not disturb while driving feature will automatically detect when someone is in a car and will block notifications and texts and stop drivers from opening apps on their phone.

    The system can send an automatic text response saying the person is driving and it will still allow drivers to take hand-free calls.

    The new iPhone software will prompt people to turn on the do not disturb mode but the driver can ignore the advice and risk the distraction of looking at a smartphone.